Agent Assist (Interactive Guide)
Agent Assist proposes resolution paths for a ticket in HaloPSA, walks the technician through the chosen path one step at a time, and drafts the customer e-mail or internal note for each step.
Written By Chris Scaminaci
Last updated About 1 hour ago
Agent Assist is the screen of the Interactive Guide. It reads a ticket, proposes resolution paths, and walks you through the one you choose a step at a time. For each step it can draft the customer e-mail or the internal note. Technicians use it from inside HaloPSA while they work a ticket.
Before you start: Agent Assist opens as a tab on a HaloPSA ticket named Agent Assist (Interactive Guide). An administrator adds the tab; see Adding QuantumOps tabs to HaloPSA. It works only inside HaloPSA: opened straight from a browser address bar it shows Access Denied, and it does not ask you to sign in to QuantumOps. Interactive Guide is a module that is on unless an administrator turned it off. The guide's settings are on the Guides tab of Q-Director Settings; see Q-Director: guides and the guide simulator.
The parts of the screen
Choose a resolution path
When a ticket has no active guide, Agent Assist builds the list of paths. It shows Generating Support Paths while it works, then Select Your Resolution Path.
- Read the paths. Each path is a numbered list of up to five steps. The first path is the recommended one: it is marked Recommended and highlighted.
- Select Select This Path under the path you want. The guide starts at step 1.
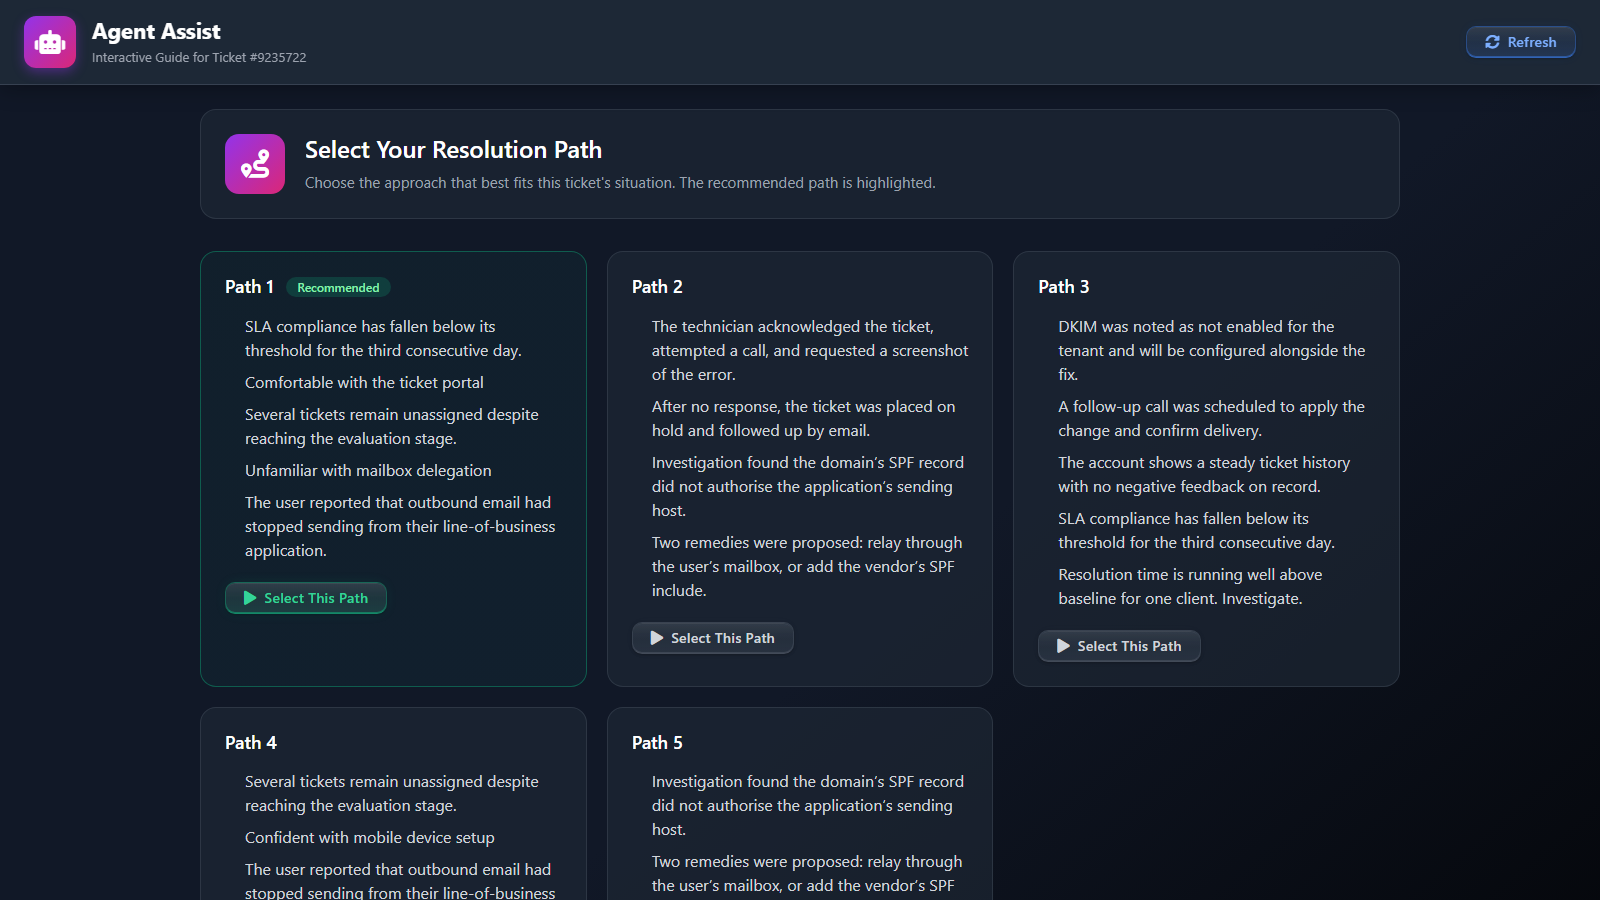
The paths come from the ticket's analysis (see The Ticket Dashboard in HaloPSA). If the analysis has not produced paths for the ticket yet, Agent Assist offers three general-purpose paths instead. They look the same as analysed paths, and the first is still marked Recommended, so check that the steps fit the ticket before you start. If it cannot produce a list at all, it shows Unable to Generate Paths; select Try Again.
Create a custom approach
If no path fits, select Create Custom Approach, under None of these fit?. A small window opens where you describe your own approach; see Create a custom approach. If the ticket already has a guide running, select Abandon on it first: a custom approach starts a separate guide and does not end the running one. When you use the approach the window closes. Select Refresh in Agent Assist to load it.
Work through the steps
Once a path is chosen, Current Step shows "Step n of m" and the text of the step.
After the last step the card reads All Steps Completed! with a Complete Guide button.
The header buttons act on the whole guide:
Complete and Abandon record different outcomes, so choose the one that matches what happened. If the ticket was resolved another way, abandon the guide.
After Complete, a confirmation appears and the finished guide stays on screen. Select Refresh to return to Select Your Resolution Path.
Follow your progress
The Resolution Path card shows Resolution Progress as a percentage and lists every step as Complete, Skipped, In Progress or Pending. Select a step to see its text and status.
The metrics bar and the Action History card carry the same progress in a shorter form. Time on Step counts from when you reached the current step, or from the last time you opened or refreshed the page on it.
Draft and send a reply
The Generate Response panel drafts a reply for the current step and sends it to the ticket.
- On the current step, select Generate Response. The panel opens at the bottom of the screen and starts a draft. It shows AI is crafting your response... while it works, and Draft ready appears in its title bar when the draft is there.
- Under Response Type, choose Email to Customer or Internal Note. Email to Customer is selected first. If a draft already exists, changing the type drafts it again for the new type.
- For an e-mail, check the Email Subject. Read the draft in Email Body (or Note Content for a note) and edit it.
- To change the draft with AI, type an instruction under AI Refinement, for example "make it more empathetic", and select Refine. Select Regenerate for a fresh draft. Copy puts the text on your clipboard.
- Select Send Email or Post Note. The step is marked complete and the guide moves to the next step. The panel stays open and, when there is a next step, at once drafts a reply for it. To close the panel, select its Generate Response title bar.
Send Email and Post Note stay unavailable until there is text, and an e-mail also needs a subject.
Before you send, know three things:
- An e-mail reaches the customer as soon as you select Send Email. The draft is written by AI, so read it first.
- An Internal Note is visible only to agents.
- On this screen the e-mail or note is posted in HaloPSA as the ticket's assigned agent, not as the person who selects the button. If the ticket has no assigned agent, nothing is posted and the panel shows Ticket has no assigned agent. Please assign an agent first. Assign an agent in HaloPSA, then send again.
In HaloPSA the entry appears inside a box headed Interactive Guide Action, which shows the type of action and a short session code. The customer's e-mail contains only your text.
Sending from this panel does not depend on Enable Halo Posting. That setting controls only the guide notes described in Guide notes in HaloPSA and their action pages.
Get help while you work
Help and Chat with Qubit both open the Qubit Guide Assistant, a chat that knows the ticket, the current step and the guide's status. It offers quick questions and, where file attachments are enabled for your organisation, lets you attach a file. See Get help while you work. For the same chat outside a guide, see Chat with Qubit from a HaloPSA dashboard.
Continue in the extension
A guide session is shared with the browser extension. A guide you start in Agent Assist continues in the extension's Assist tab, and the other way round. See Assist tab.
Related pages
- Guide notes in HaloPSA and their action pages: the notes the guide can add to a ticket and the guide's action pages.
- Q-Director: guides and the guide simulator: the guide's settings.
- Assist tab: the same guide in the browser extension.
- The Ticket Dashboard in HaloPSA: the ticket analysis the paths come from.
- Chat with Qubit from a HaloPSA dashboard: the chat behind Help and Chat with Qubit.
Was this helpful?
Still need help? Ask the team