Setting up identity verification
How to connect Identity Verification to your Microsoft Entra tenant with the setup wizard, run preflight, and get each client's Microsoft administrator to consent.
Written By Chris Scaminaci
Last updated About 1 hour ago
You set Identity Verification up once for your whole organisation, then each client's Microsoft administrator consents once for their own directory. This page covers both. The setup wizard walks you through your side in two steps. The setup guide beside it lists the exact Microsoft portal steps and builds the consent links.
Before you start:
- The Identity Verification module is on in Module Management, and you hold the Administrator or Identity Verification Admin role.
- A Global Administrator of your own Microsoft Entra tenant creates the app registration. It takes about ten minutes and you do it once.
- For each client you onboard with Authenticator step-up, a Global Administrator or Privileged Role Administrator in that client's tenant can grant consent.
- Authenticator step-up works on every Microsoft 365 plan at no extra cost. Microsoft Entra Verified ID is only needed if you choose that method.
The guide opens from the wizard's Setup guide button, from a client's settings page, or at /settings/identity-verification/setup-guide.
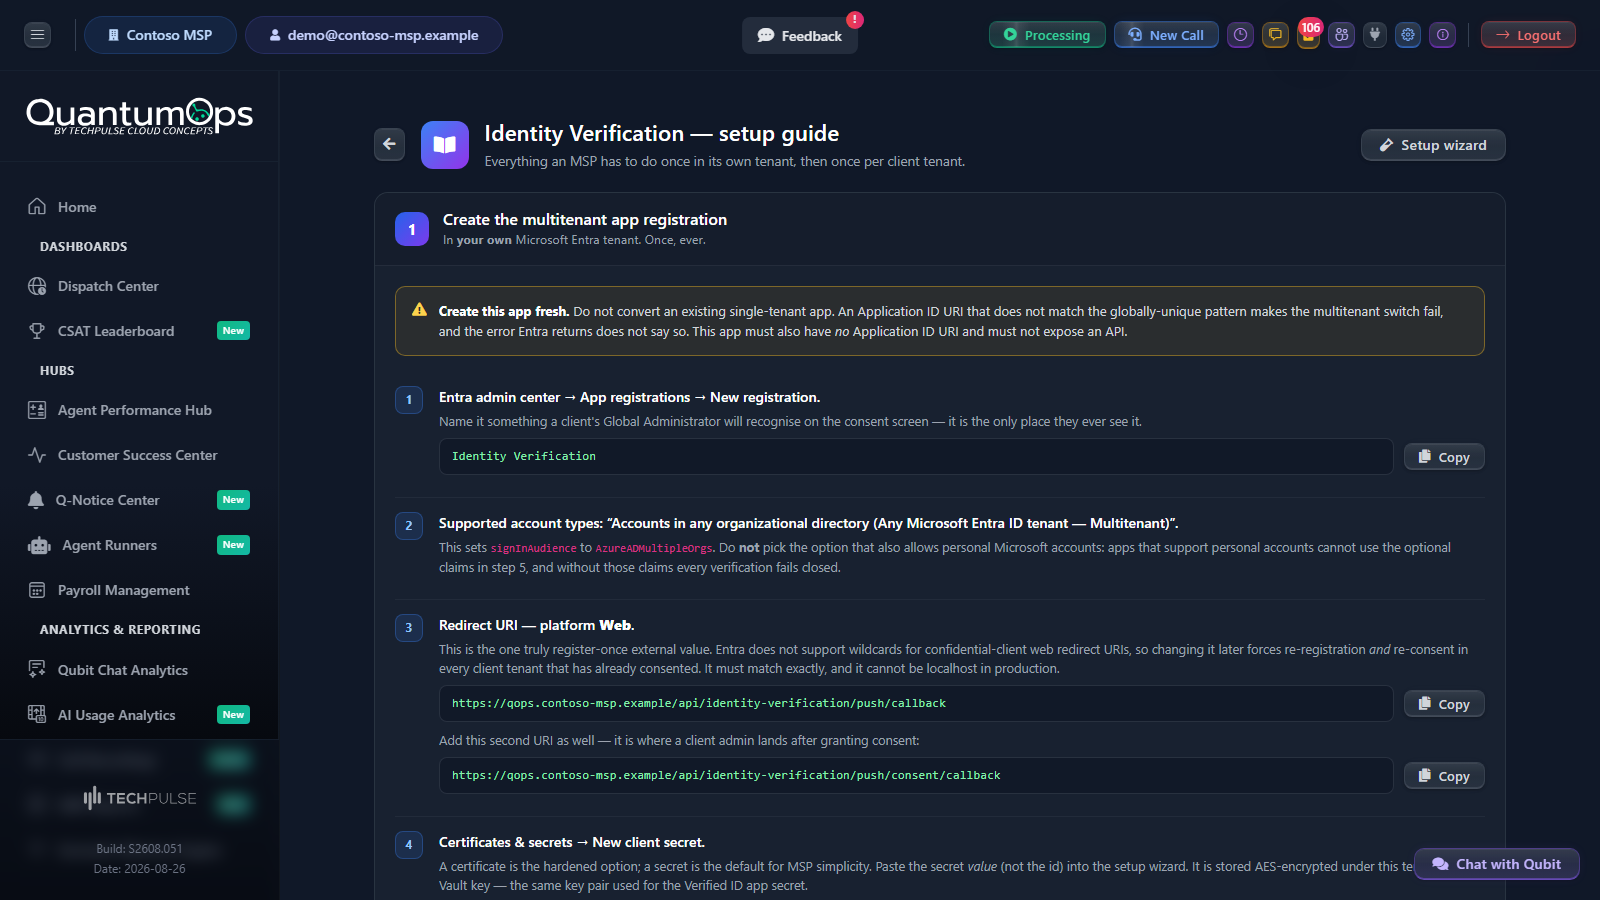
Create the app registration in your own tenant
The guide's first section, Create the multitenant app registration, covers this. Follow it in your own Microsoft Entra tenant.
In the Microsoft Entra admin center, open App registrations → New registration. Create the app fresh rather than converting an existing single-tenant app, and do not give it an Application ID URI or expose an API. Name it something a client's Global Administrator will recognise, because the consent screen is the only place they see the name. The guide suggests the name "Identity Verification" and has a Copy button for it.
For supported account types, choose the multitenant option, "Accounts in any organizational directory (Any Microsoft Entra ID tenant - Multitenant)". Do not choose the option that also allows personal Microsoft accounts: apps that allow them cannot use the optional claims in step 5, and every verification would then be refused.
Add a redirect with platform Web for each of the two addresses the wizard and the guide show: the sign-in redirect and the consent redirect. Register both exactly as shown. Microsoft does not accept wildcards, so changing either later means registering again and getting every client to consent again.
Open Certificates & secrets → New client secret, and copy the secret value, not the secret ID.
Open Manifest and add the optional claims below. Without them the sign-in carries no information about how the caller proved themselves, so every verification is refused, including legitimate ones. Use the manifest rather than Token configuration → Add optional claim: that picker offers
auth_timebut notamr."optionalClaims": { "idToken": [ { "name": "amr", "essential": false }, { "name": "auth_time", "essential": false } ] }Open API permissions and add these Microsoft Graph permissions. Delegated:
openid,profileandemail. Application:AuditLog.Read.All, and optionallyPolicy.Read.All.AuditLog.Read.Alllets QuantumOps read which sign-in factors the caller used and when their Authenticator was registered.Policy.Read.Allis only needed to detect how each client enforces multi-factor sign-in. Do not addUser.Read: the sign-in already carries what is compared, and it would put an extra permission on the client's consent screen. Do not addoffline_access: this flow proves one sign-in at one moment and keeps no refresh token for the caller.Copy the Application (client) ID and the Directory (tenant) ID. You enter both in the wizard.
Run the setup wizard
Open the wizard from Set Up Identity Verification on the management screen, or go to /settings/identity-verification/setup. It has two steps, Mode & Microsoft and Preflight & go live. Help Tour starts a tour of the step you are on.
Step 1: choose the method and connect Microsoft
- Under How callers get proven, choose Authenticator step-up (marked Recommended) or Microsoft Entra Verified ID. Choosing Verified ID also requires the Verified ID section described below.
- Choose the Minimum assurance level: Basic (any multi-factor method, including SMS, voice, authenticator codes and security keys), Substantial (Authenticator or Verified ID, recommended) or High (Verified ID with Face Check only). Substantial is the default because it excludes the factors that a SIM swap can defeat. This is the floor for your whole organisation, and each client can override it. Anything that resolves below the floor is refused rather than quietly downgraded.
- Under Connect Microsoft, enter the Directory (tenant) ID of your own tenant. For Authenticator step-up, also enter the Application (client) ID of the multitenant app and its Client secret. The secret is stored encrypted and never shown again; on later visits the field reads "stored — leave blank to keep".
- Check that both addresses, Redirect URI to register and Consent redirect URI to register (second entry), are registered on the app as platform Web. Each has a Copy button. Without the second entry the consent step fails with a redirect mismatch.
- Use the panel on the right as a reminder. Setup Instructions lists the four tasks in Microsoft's portal and Required API Permissions lists the permissions from the previous section. Open the full setup guide opens the guide.
- Choose Save and run preflight. The button stays disabled until the required fields are filled in. For Verified ID, that includes validating the Verified ID app, unless a DID authority is already stored.
Choosing Verified ID opens the Microsoft Entra Verified ID section, and you can expand it yourself at any time. Verified ID uses a separate single-tenant app registration, and the wizard lists the eleven Verified ID permissions to give it. That app is never consented in a client's tenant, because requesting its permissions would show a client's Global Administrator all eleven for a feature that has nothing to do with them. The section holds:
If saving fails, the wizard shows Setup Failed with the reason and Back to step 1.
Step 2: run preflight and go live
Preflight runs against the configuration that was just saved, not against the form. Each check is something that, left broken, would produce a verification that waits for ever with no error. It covers the callback address, the encryption key and secrets, the app credentials, the redirect address, the optional claims, client consent, the HaloPSA fields, rate limits and licensing and, for Verified ID, the authority, linked domain, signing key and Face Check.
The summary counts checks that passed, warned, failed and do not apply, and names the method it checked. Every check that did not pass has a one-line fix and a link to the thing to change, or a Setup guide link. Fix what is listed and choose Re-run.
Two warnings are expected early on with Authenticator step-up. The optional claims check warns until a verification has completed, because it confirms the claims from real results. The client consent check warns when an enabled client that uses Authenticator step-up has not consented yet.
The bottom of the step shows one of two gates:
- Not ready to go live: at least one check failed. Fix it and re-run.
- Test it before you rely on it: nothing failed. Rehearse in the Sandbox (it contacts nobody), then run one real verification from the panel with a colleague you can phone, as described in Run one real verification before you rely on it. Preflight proves the plumbing and only a real run proves the experience. Open the sandbox takes you to the management screen, where you choose the Sandbox tab for the rehearsal. Finish and go live also returns you to the management screen and reminds you to enable Identity Verification per client, which Clients and per-client policy covers.
You can also run preflight at any time from the module's details panel in Module Management.
Run the wizard again
Reopening the wizard does not start from nothing. It opens with the stored values filled in, whether you came back to change a setting or because someone chose Reset on the management screen. Saving reactivates the same configuration, so your client settings, credentials and verification log stay attached. Secrets are the exception and are never shown: leave a secret field blank to keep the stored one, or type a value to replace it.
Get each client to consent
Authenticator step-up cannot verify anyone at a client until that client's Microsoft administrator has consented once in their own directory. Consent cannot be skipped, even though openid, profile and email look as if users could grant them: many tenants disable user consent, and AuditLog.Read.All can only be granted by an administrator. Without it the caller's sign-in stops on a consent screen they cannot clear, in the middle of the call.
The guide's section Get it consented in each client tenant offers three routes, and the first two work.
Build a consent link
- In the guide, open the Direct (per client) tab. It lists every client with its Consent status: Consented with the date, Not consented, or Consent failed when the link for that row could not be built, for example because
commonwas entered. The result of the administrator's own consent appears as a banner at the top of the guide. - Enter the client's Microsoft Entra tenant ID or one of their verified domains, for example
contoso.onmicrosoft.com. Never usecommon,organizationsorconsumers: consent has to be bound to one directory so that its tenant ID can be proven. - Choose Generate, then Copy or Open in new tab. You can build the same link from the Client Settings tab of the management screen with Consent.
- Send the link to the client's administrator. It works once and stays valid for about 15 minutes. If it expires, the consent page says so and you generate a new one.
Consent links always open in a new tab, because the technician screens can be embedded in HaloPSA and Microsoft's sign-in page cannot load inside that frame.
What the client's administrator sees
The administrator opens the link and signs in to Microsoft with an account that is a Global Administrator or Privileged Role Administrator in their own directory. Microsoft shows the permissions from the app registration and nothing else. They do not need a QuantumOps account.
When they finish, Microsoft returns them to a plain page that says Consent granted. You can close this window. and "The IT provider's identity-verification app is now authorised for this directory. Nothing else is needed from you." If consent did not complete, the page says Consent was not completed. and gives the reason. If the reason says Microsoft would not issue a token yet, consent usually took effect a few seconds later: generate a new link (the first one can be used only once) and have the administrator open it again.
The result page also links to the setup guide for anyone who administers your helpdesk. The guide then shows a banner reading "Consent recorded. The client's Entra tenant id was proven and stored." or "Consent failed" with the reason, and the client's row changes to Consented. QuantumOps stores the directory that Microsoft proves with a token, not the value in the return address.
Check consent for every client at once
If you deployed the app some other way, such as CIPP, a partner portal or your own scripts, the clients are consented in Microsoft but QuantumOps does not know yet. Verify asks Microsoft directly whether the app is present, consented and effective in a client's directory.
- In the guide's Direct (per client) tab, enter each client's tenant ID or domain.
- Choose Verify on a row, or Verify all to check every row one after another. Rows with no tenant ID are skipped and counted, so a summary such as "18 verified, 2 failed, 4 skipped" shows how many still need an identifier. The same Verify button is on the Client Settings tab and in its Admin consent dialog, where it is called Verify deployment.
Enter the client's own tenant, not yours. Your own directory always issues the app a token, so a check against it proves nothing about the client and is refused.
Know the limits
The last section of the guide, Per-client prerequisites, and the honest limits, is worth reading before you promise a client anything.
Authenticator step-up
- Forcing multi-factor sign-in on the step-up needs Entra ID P1 in the client's tenant. Without it the sign-in cannot be compelled. QuantumOps reads what the caller actually did and refuses the verification when it is not good enough.
- The caller must have Microsoft Authenticator registered in their own tenant. If they do not, this method cannot verify them, and that is a refusal rather than a downgrade.
- Passwordless Authenticator phone sign-in makes the step-up feel like a tap. On Entra ID Free tenants, admin control over verification methods is not available, so the step-up is password plus number match. Tell the client that their users will type a password during the call.
- Microsoft's registration report can lag by up to 36 hours in both directions. QuantumOps treats it as advice only.
- The caller completes a full sign-in on their own phone. It is never a one-tap. Technicians must not read a number to the caller or tell them what to approve.
Microsoft Entra Verified ID
- Quick setup in Microsoft needs a registered custom domain. Without one, setup falls back to Advanced and its screens differ.
- The person setting it up needs both the Authentication Policy Administrator and the Application Administrator roles. Either alone is not enough.
- It is not available in education tenants.
- Microsoft limits requests to two per second per tenant and caps credential validity at six months, which is why the validity fields stop at 180 days.
- A failed Face Check match still bills. A caller who fails three times costs three matches.
Related
- Identity verification: the two methods and the management screen.
- Clients and per-client policy: onboard a client once it has consented.
- Sandbox, configuration and HaloPSA integration: test a verification before you rely on it.
Was this helpful?
Still need help? Ask the team